Showing posts with label DIY. Show all posts

10/13/2014

Hooded Towel Tutorial

Several months ago, Jill highlighted a collection of DIY Baby Necessities for Under $60. Included in that collection was the Hooded Towel - something that Joanne has made for all of our kids and that we LOVE. So here, finally, is the tutorial for making your own kids' hooded towels. 


The combined total of hooded towels used by members of The Sisterhood is 13, and we all love them!  These practical towels are very economical and fairly simple to make.  I have created the pattern for these by mimicking a towel I received as a shower gift when I was expecting my now-six-year-old, Elizabeth (who still uses that towel).

Supplies:


  • 1 bath towel (I use the "Big One" brand from Kohl's)
  • 1 wash cloth
  • 1/4 yard coordinating soft flannel (for me, on sale and with a coupon at JoAnn's)
  • matching thread


Step 1: Project Preparation


Pre-wash the towel, washcloth, and flannel.

Step 2: Trim Work Preparation


Iron the strip of flannel, trimming the frayed edges of the fabric to create clean edges.  Cut the fabric in half longways (which creates two long strips approximately 4 inches wide each).  Finish edges of the fabric by pressing 1/2 inch to the back side of the fabric.  This will create two 3 inch strips of fabric to trim the towel and washcloth.


Step 3: Trim Work Sewing


Pin a strip of fabric to the towel on each end, a few inches from the edge of the towel (I just line it up with the decorative edge located a few inches from the edge of the "Big One" towel).   Trim the excess fabric (one piece which should be long enough to trim the washcloth).  Fold approximately 1/2 inch of fabric under on each end to create a hem all the way around the trim fabric. Sew strip of fabric in place.  I have used straight or zigzag stitching for this step.


Step 4: Hood Trim


Pin one of the excess trim pieces to the washcloth, approximately 1-2 inches from the edge. Sew in place.


Step 5: Hood Preparation


Fold washcloth as pictured (trimmed edge facing in).


Step 6: Hood Sewing


Sew along edges shown to create the hood part of the towel.  Be sure to open up the washcloth so that the back does not get sewn into the seams you are creating in the front.  I like to reinforce these edges with some extra zig-zagging as these seams get a little extra pull when the towel is being worn.  

Turn hood right side out.


Step 7: Towel Preparation


Pin gathers in the top of the towel as pictured in the center top of the towel.  There are four gathers, each 2 inches wide, with some space in the middle.  The entire length of the gathers combined equals 12 inches.  These gathers cause the towel to wrap around the child's shoulders nicely.


Step 8: Project Completion


Pin hood to towel as pictured above.  The length of the gathers and the width of the washcloth should be about the same.  Position the bottom of the washcloth approximately one inch overlapping the gathered towel.  Sew the washcloth to the towel by stitching along the top edge of the towel and following around the bottom edge of the washcloth.  I reinforce this sewing by a second run of zig-zag stitches.  Be sure to remove all pins. 


Stay tuned for Jill's tutorial on soft Luvy blankets.

Joanne for the Sisterhood

6/12/2014

DIY Pacifier Clip


Material Needed:
  • 1” Metal Suspender/Pacifier Clip (a multi-pack can be found online for under $5)
  • 4” x 15” of chosen fabric
  • 1” x 1/2” velcro rectangle
  • coordinating Thread

Instructions

  1. Sew a ¼” hem on each short edge
  2. Iron material in half long ways
  3. Fold long edges to center and iron again
  4. Fold back in half
  5. Sew along the long edges of material
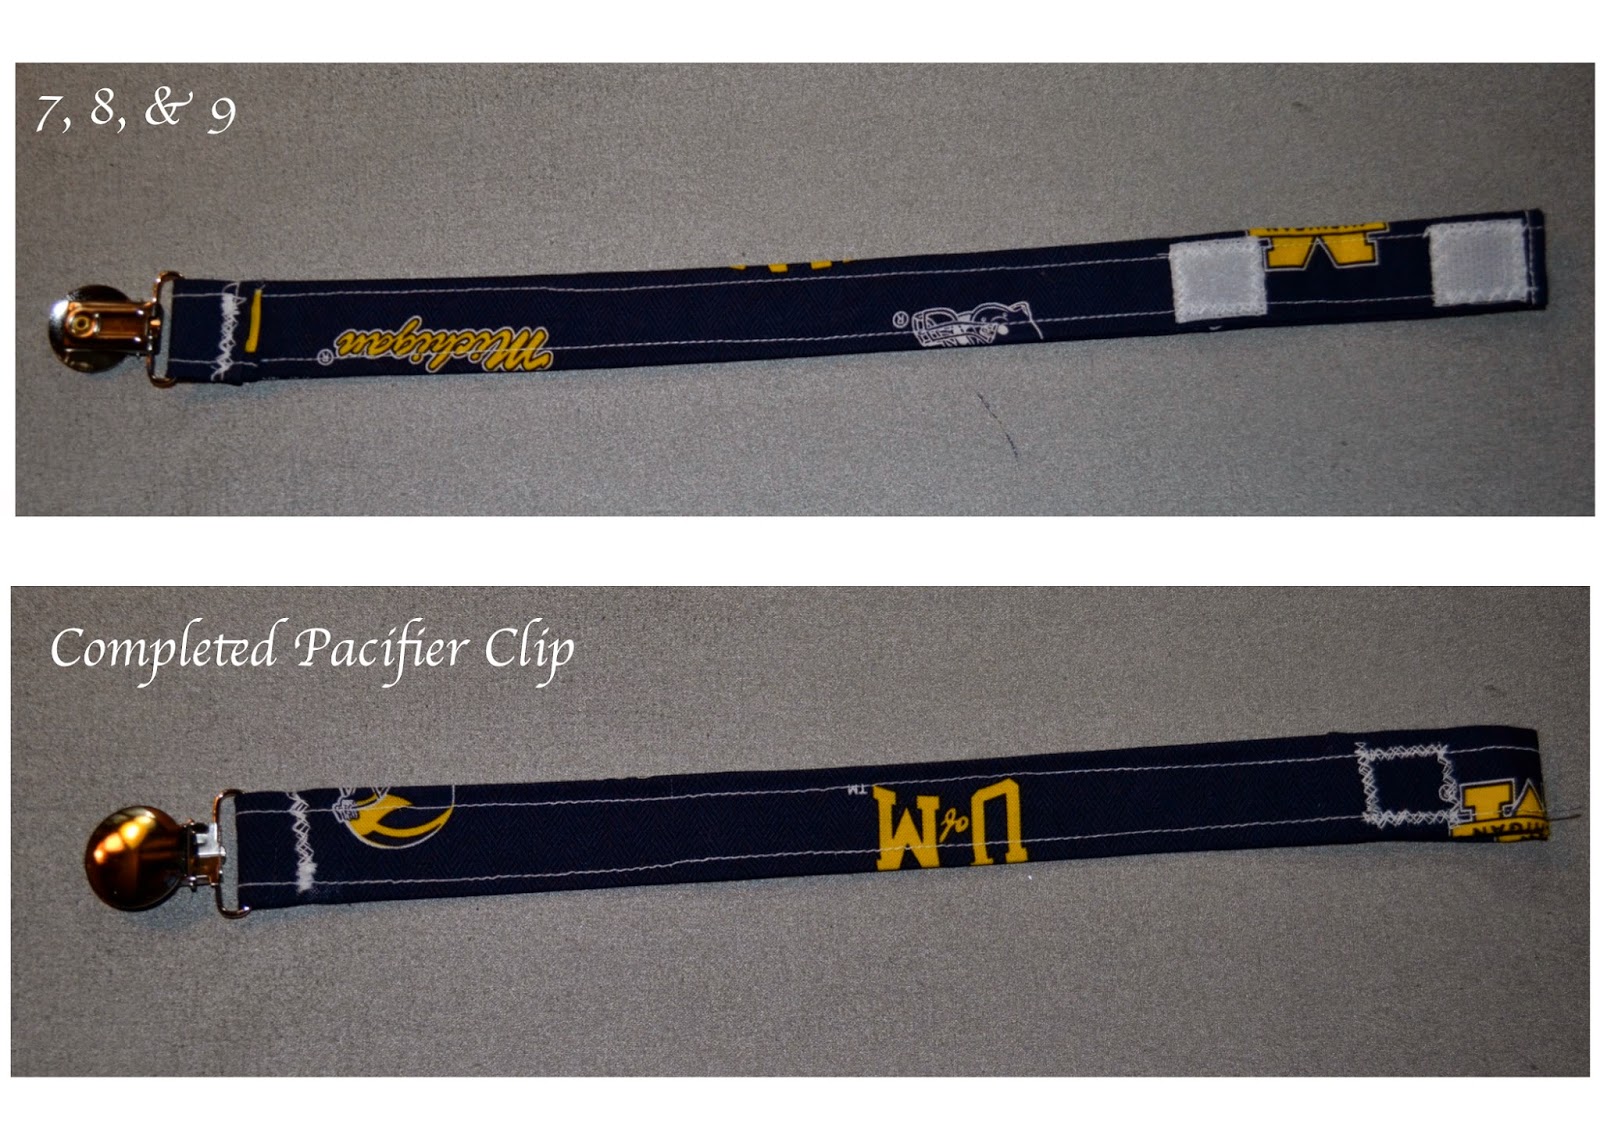
  6. Pull the end through the metal pacifier clip, and zig-zag stitch the end in place (use several forward and backward stitches to secure it).
  7. Lay the clip face down
  8. Fold 2” from the end back, and mark where the velcro will go
  9. Attach velcro to where you marked


6/09/2014

DIY Baby Necessities for Under $60

I recently had the privilege of attending a baby shower of a very good friend. Pinterest has been a great resource in coming up with ideas for DIY gifts for preparing for a baby. The above picture was my "package" of coordinating items that I was able to create for under $60.

Quilt
The basic design and pattern was found at the below link. Materials were purchased at Hobby Lobby and JoAnn Fabric (use coupons). The quilting stitches used were a basic free motion heart border along the sashing pieces of the quilt.
Link for Modern Baby Quilt


Soft Magnetic Alphabet Letters
I used up some of my quilting scraps to make these. A great hands on tool for use from infant to toddlers!

Link for Alphabet Letters


Soft Blocks
Another great scrap buster, and fairly cost effective when the foam is purchased with a coupon at your local fabric store.
Link for Soft Blocks


Pacifier Clips
I Created a pattern, that I will have a do it your self tutorial in a future post.


Boppy Cover
Great pattern that fits snuggly for a standard boppy pillow. I also have many modern patterns for sale in my etsy shop, CreativeSeams.
Link for Boppy Cover

Fabric Organizer Bin
When I was planning our little one's nursery, I had a difficult time finding what I needed to organize everything in the nursery. The following Organizer Bin pattern made the perfect organizational tool.


Soft Luvy Blankets
I created a pattern with tutorial posted here.


Hooded Towel
Joanne recently made these towels for each of the nieces and nephews, and we all love them. Here's her tutorial for making your own - either for yourself or for friends and family.


So as you can see, we have lots of ideas to share in the near future - so stay tuned and be ready for some fun summer crafting projects!