Showing posts with label Arts and Crafts. Show all posts

12/11/2014

Felt Monogram Ornaments

I love felt for so many reasons. The colors are endless, the textures are finger-friendly, the edges never need finishing, and the cost is unbeatable at 25 cents a sheet. I started making many of our crafts out of felt years ago and still haven’t gotten over it (in fact, even starting to sell some online now). So this post will show you a simple ornament tutorial made from felt that can be completely made by hand…no sewing machine required (inspired by this post here).

SARAH'S FELT MONOGRAM ORNAMENTS


You’ll need to cut 2 circles of desired color and a white monogram letter. You can either eyeball the letter and cut it out or print out an enlarged letter from your printer, trace it onto the white felt, then cut.

Blanket stitch your white monogram letter to one of your circles. This is done by inserting your threaded needle down through the monogram and up through the edge of the monogram, wrapping your thread tail around the needle and pulling the needle through. Repeat all the way around your letter and inside any letter holes if you wish. 


On the second colored circle, hot glue a tab of ribbon or twine to the top center.

“Sandwich” the two circles together, making sure the side with the hot-glued tab is facing the inside. Begin a running stitch through the circle “sandwich” edge and at the halfway mark stop to add some polyfill to the inside. Finish the running stitch making sure to tuck the finishing knot on the back or the inside edge.


Hang or wrap your ornament - and enjoy gifting these to your friends and family! 


Sarah for the Sisterhood


**Check out Sarah's felt etsy shop here**


10/21/2014

I Spy Quilt Tutorial


Pinterest provides so many wonderful ideas for quilt designs. I came across this idea a while ago, a quilt that has hidden items for little ones to discover. I decided to create this educational quilt for each family, for the nieces and nephews for their birthday this year (shhhh....don't tell them). The finished quilt size is a lap quilt (36"x42").

UPDATE: After popular demand, Jill has decided to offer completed versions of this quilt on her etsy shop, for those of you who aren't as crafty (or have just run out of time). These quilts are available on her shop for $30. 


                                SUPPLIES NEEDED


            • 42 - 6.5"x6.5" squares (as many fun and random fabrics you want - there are 17 different ones in the quilt pictured)
            • 1 - 40"x48" fleece (backing)
            • 4 - 4"x44" cotton (binding)


QUILT TOP


  1. Sew 6 different squares together to create a row using a 1/4" seam allowance
  2. Do step #1 seven times
  3. Sew each row together creating a quilt top (1/4" seam allowance)


QUILTING


1. Using 40"x48" fleece
2. Place the quilt top in the middle of the backing
3. Pin in place
4. Start in one corner and sew diagonally through the squares, sewing both layers together
5. Repeat in one direction through all of the rows and columns
6. Switch and do the same thing in the other direction, creating an x in each square


BINDING

  1. Create your binding tape
  2. Sew binding tape along the edge (1/2" seam allowance), mitering the corners as you go
  3. Trim the excess backing material
  4. Turn binding tape to back
  5. Pin in place
  6. Sew 1/4" in to the quilt from the ditch of the binding


Create fun I Spy clues for the different things within the quilt squares!

10/15/2014

Soft Luvy Blanket Tutorial

Here's another post highlighting a piece from Jill's DIY Baby Necessities collection.


Material Needed:
  • 2 soft Minky or Cuddly Fabrics of your choice cut to 13”x13”
  • Coordinating Thread


Instructions


  1. Place fabric right sides together
  2. Sew ½” seam allowance along all 4 sides leaving a 3” opening in the middle of one side (This allows you to turn the material in the next step)
  3. Turn the blanket inside out through the opening
  4. Pin the opening closed
  5. Sew a ¼” topstitch (either straight or decorative) along the outside edge of the blanket (This will seal the turning hole, and give a nice finish to the blanket)


10/13/2014

Hooded Towel Tutorial

Several months ago, Jill highlighted a collection of DIY Baby Necessities for Under $60. Included in that collection was the Hooded Towel - something that Joanne has made for all of our kids and that we LOVE. So here, finally, is the tutorial for making your own kids' hooded towels. 


The combined total of hooded towels used by members of The Sisterhood is 13, and we all love them!  These practical towels are very economical and fairly simple to make.  I have created the pattern for these by mimicking a towel I received as a shower gift when I was expecting my now-six-year-old, Elizabeth (who still uses that towel).

Supplies:


  • 1 bath towel (I use the "Big One" brand from Kohl's)
  • 1 wash cloth
  • 1/4 yard coordinating soft flannel (for me, on sale and with a coupon at JoAnn's)
  • matching thread


Step 1: Project Preparation


Pre-wash the towel, washcloth, and flannel.

Step 2: Trim Work Preparation


Iron the strip of flannel, trimming the frayed edges of the fabric to create clean edges.  Cut the fabric in half longways (which creates two long strips approximately 4 inches wide each).  Finish edges of the fabric by pressing 1/2 inch to the back side of the fabric.  This will create two 3 inch strips of fabric to trim the towel and washcloth.


Step 3: Trim Work Sewing


Pin a strip of fabric to the towel on each end, a few inches from the edge of the towel (I just line it up with the decorative edge located a few inches from the edge of the "Big One" towel).   Trim the excess fabric (one piece which should be long enough to trim the washcloth).  Fold approximately 1/2 inch of fabric under on each end to create a hem all the way around the trim fabric. Sew strip of fabric in place.  I have used straight or zigzag stitching for this step.


Step 4: Hood Trim


Pin one of the excess trim pieces to the washcloth, approximately 1-2 inches from the edge. Sew in place.


Step 5: Hood Preparation


Fold washcloth as pictured (trimmed edge facing in).


Step 6: Hood Sewing


Sew along edges shown to create the hood part of the towel.  Be sure to open up the washcloth so that the back does not get sewn into the seams you are creating in the front.  I like to reinforce these edges with some extra zig-zagging as these seams get a little extra pull when the towel is being worn.  

Turn hood right side out.


Step 7: Towel Preparation


Pin gathers in the top of the towel as pictured in the center top of the towel.  There are four gathers, each 2 inches wide, with some space in the middle.  The entire length of the gathers combined equals 12 inches.  These gathers cause the towel to wrap around the child's shoulders nicely.


Step 8: Project Completion


Pin hood to towel as pictured above.  The length of the gathers and the width of the washcloth should be about the same.  Position the bottom of the washcloth approximately one inch overlapping the gathered towel.  Sew the washcloth to the towel by stitching along the top edge of the towel and following around the bottom edge of the washcloth.  I reinforce this sewing by a second run of zig-zag stitches.  Be sure to remove all pins. 


Stay tuned for Jill's tutorial on soft Luvy blankets.

Joanne for the Sisterhood

6/12/2014

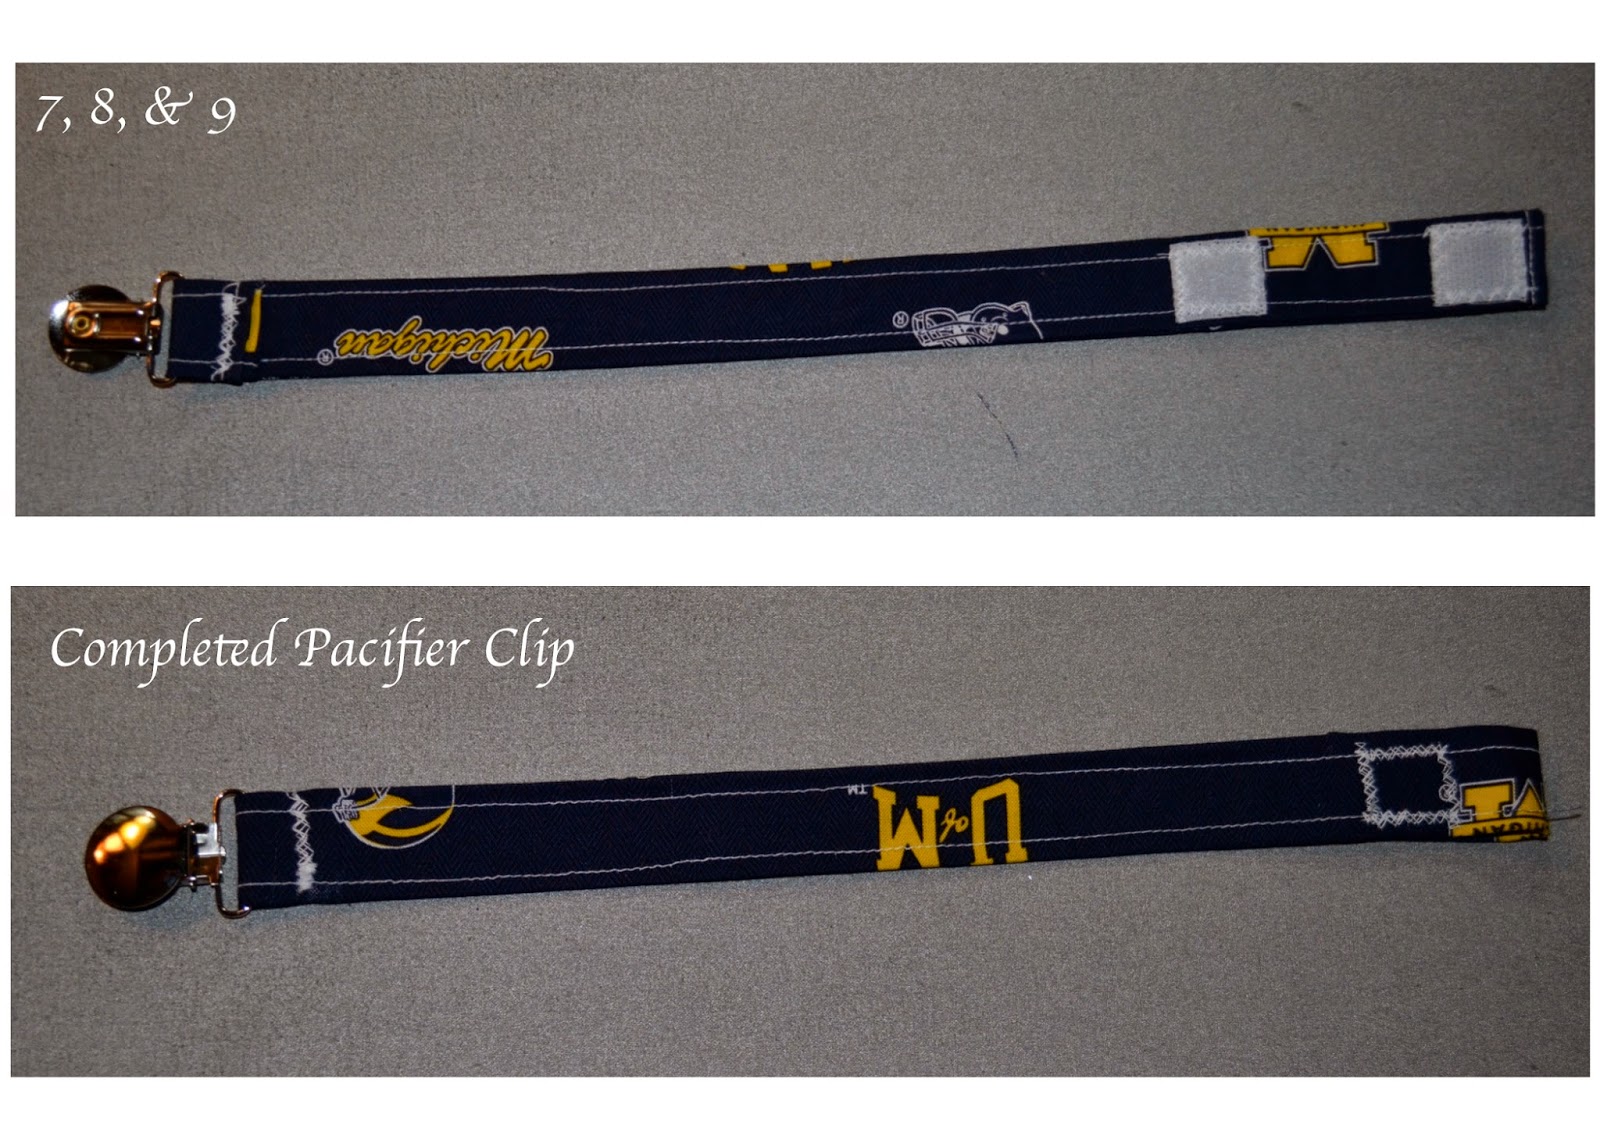
DIY Pacifier Clip


Material Needed:
  • 1” Metal Suspender/Pacifier Clip (a multi-pack can be found online for under $5)
  • 4” x 15” of chosen fabric
  • 1” x 1/2” velcro rectangle
  • coordinating Thread

Instructions

  1. Sew a ¼” hem on each short edge
  2. Iron material in half long ways
  3. Fold long edges to center and iron again
  4. Fold back in half
  5. Sew along the long edges of material
  6. Pull the end through the metal pacifier clip, and zig-zag stitch the end in place (use several forward and backward stitches to secure it).
  7. Lay the clip face down
  8. Fold 2” from the end back, and mark where the velcro will go
  9. Attach velcro to where you marked


6/09/2014

DIY Baby Necessities for Under $60

I recently had the privilege of attending a baby shower of a very good friend. Pinterest has been a great resource in coming up with ideas for DIY gifts for preparing for a baby. The above picture was my "package" of coordinating items that I was able to create for under $60.

Quilt
The basic design and pattern was found at the below link. Materials were purchased at Hobby Lobby and JoAnn Fabric (use coupons). The quilting stitches used were a basic free motion heart border along the sashing pieces of the quilt.
Link for Modern Baby Quilt


Soft Magnetic Alphabet Letters
I used up some of my quilting scraps to make these. A great hands on tool for use from infant to toddlers!

Link for Alphabet Letters


Soft Blocks
Another great scrap buster, and fairly cost effective when the foam is purchased with a coupon at your local fabric store.
Link for Soft Blocks


Pacifier Clips
I Created a pattern, that I will have a do it your self tutorial in a future post.


Boppy Cover
Great pattern that fits snuggly for a standard boppy pillow. I also have many modern patterns for sale in my etsy shop, CreativeSeams.
Link for Boppy Cover

Fabric Organizer Bin
When I was planning our little one's nursery, I had a difficult time finding what I needed to organize everything in the nursery. The following Organizer Bin pattern made the perfect organizational tool.


Soft Luvy Blankets
I created a pattern with tutorial posted here.


Hooded Towel
Joanne recently made these towels for each of the nieces and nephews, and we all love them. Here's her tutorial for making your own - either for yourself or for friends and family.


So as you can see, we have lots of ideas to share in the near future - so stay tuned and be ready for some fun summer crafting projects!


2/06/2014

The Value of Play Dough (and how to make your own)

As the mother of preschoolers, I often feel like my full time job is cleaning up messes.  Therefore, it is in my nature to put an end to any play that is going to result in more messes.  However, when it comes to play dough, I feel that the mess is worth the benefits.


First of all, I am not a huge fan of store bought Play-Doh.  It smells funny and leaves a mess all over the table, chairs, floor, and children.  It's also sticky, costly (if you’re going to have a good quantity and variety of colors) and comes in rather small quantities.  On the contrary, I am a huge fan of homemade play dough, which doesn’t smell (well, not like the store bought kind) and is easier to deal with mess-wise than the store bought kind.  It also lasts for a long time in a sealed container and can be made in larger quantities in whatever color desired.  For the most part, homemade play dough is fairly inexpensive (well, except for the cream of tartar, which I have recently found very affordable at our local Aldi). So for these reasons, and for the benefit of mothers like me who like learning activities - and less mess - I'm sharing my Top 10 reasons for encouraging play dough play time with your kids, along with my favorite play dough recipe below:


1.  FINE MOTOR SKILLS - Before a child can maneuver a pencil to make letters and numbers, he must get lots of practice using his fingers.  Play dough helps fine tune those finger muscles in an enjoyable way.


2.  IMAGINATION & CREATIVITY - Creating a zoo, an elaborate meal, a train, a baseball game, etc... can all be accomplished through the use of play dough. You'll also enjoy seeing what kinds of things each of your kids likes to create over and over.


3.  SHARING - Ah, every mom's favorite word. Multiple children + multiple colors + plus multiple tools = great opportunities for sharing, taking turns, and working through getting along.


4.  EARLY SCISSOR SKILLS - Cutting play dough is much easier than cutting paper.  We like to roll the play dough into a long thin snake, and then use scissors to chop it up into small pieces. Hopefully too, your child won't initially associate scissors with cutting all things paper.


5.  GREAT TALK TIME - I love to talk with my kids while we play with play dough. And I love to listen to them talk to each other if I’m occupied with another kitchen task while my kids play with play dough together.


6.  FOCUSED ATTENTION TIME - The ability to sit still and concentrate on one activity for an extended time period is lost on many preschoolers.  A play dough playing session can help train children to focus while still enjoying themselves.


7.  NUMBERS & LETTERS - Play dough can aid in the teaching of numbers and letters (either by shaping the characters with the play dough or through the use of cookie cutters similar to these).


8.  SHAPES - Play dough is a great manipulative for learning shapes - both 2 and 3 dimensional.  It’s pretty hard to draw a sphere or a cone, but play dough makes visualizing in 3 dimensions easy.


9.  GREAT FOR TACTILE LEARNERS - Play dough is a fabulous tool in the hands of a tactile learner!  If you have a child that learns best through the form of touch, please don’t rob them of the opportunity to learn via play dough.


10. SCHOOL PROJECTS - We have used play dough to make a volcano for a science project and a 3D map for a geography project.  How about those 3rd grade solar system projects, or the 6th grade model of a cell project?  The play dough possibilities are endless, and a real staple around here.


BONUS: A final benefit of play dough … stepping on play dough doesn’t hurt nearly as much as stepping on a Lego. :)


RECIPE FOR HOMEMADE PLAY DOUGH

Ingredients:
  • 1 c. flour
  • ½ c. salt
  • 2 tsp. cream of tartar
  • 1 c. water
  • 2 Tbsp oil
  • 1 tsp. food coloring


Directions: 
Combine flour, salt, and cream of tartar in medium sized sauce pan. Gradually stir in water, and oil. Cook over medium heat, stirring constantly until a ball forms. Remove from heat and knead food coloring into dough on a protected surface as color may bleed out while dough is warm.

Store play dough in either a sealed plastic container (similar to Gladware) or a Ziploc style bag at room temperature.


2/03/2014

Albright 2013 Memory Quilt

Today Jill is sharing a special project that she completed for our parents for Christmas - a Family Memory Quilt. If you haven't yet, check out her Etsy shop featuring the many personalized quilts she has for sale. Perfect for those of us who aren't quite this crafty. 


Since we couldn't all be together as a family this past Christmas, I decided, with the help of the other sisters, to create a special memory quilt for our parents. 

 While different family groups were together around Thanksgiving, I had them trace their hands and place their signatures onto paper. This was done for all family members, except Dad and Mom. 


Taking the hands and signatures I transferred the outlines onto fabric and hand-embroidered them (using just a simple backstitch). Each family group had their own color thread, and these became the white squares within the quilt.

A special square I added, was the year - important, as this is the Albright family as of 2013, which will be growing by at least two more this year (Sarah expecting her fifth in the next month, and me expecting our second in August). 


Dad and mom were clearly surprised and excited by the gift - so mission accomplished! 


1/29/2013

2 Announcements & a Giveaway

Sorry - Giveaway is Closed
 
Here are two exciting announcements from the Sisterhood along with a special giveaway that celebrates both! Read on.

Julie, David, and baby Rudie (coming soon)
Julie's Big News: Many of you that are personal friends of some of us will already know this, but we wanted to let the rest of our readers know about the newest addition to the Sisterhood - even if he is a boy. :-) Julie and her husband David will be expecting their first child (a son) around the beginning of May. So far Julie is doing well and we can't wait to meet this little guy! 

Jill's Big News: No, Jill doesn't have any new family members to announce yet - she definitely has her hours joyfully filled with Aaron. But despite having a baby, she's found time to open up a new online shop on Etsy - featuring a number of the items she has gifted us sisters with in the past. Now these gifts are available (for a small fee) to everyone! Welcome, CreativeSeams

Nursery-in-a-Box ~ by CreativeSeams
Many of these products were produced for Jill's nursery and growing baby. But a number of them would also work well for everyday organizational needs, such as this awesome caddy. She also began developing a few things for Julie and her coming baby. This picture on the left displays a number of the items and colors Julie will be using for her nursery. Almost all of the items can be customized with particular colors and patterns of your choice - at no additional charge! We're certainly hoping that you can find some great things here for any friends, daughters, or sisters that you know may be expecting soon. So just to help encourage you to share this information with everyone you know, we'll be doing ...

... A Giveaway!
Organizational Caddy ~ CreativeSeams
Many of you have done our giveaways here before, but here are the details and a few reminders. We will be awarding one Organizational Caddy from CreativeSeams to the randomly selected winner of this giveaway. The winner will be able to choose what color of caddy they would like as well. You will be able to submit up to three entries by doing each of the following:

  • Visit Jill's CreativeSeams Etsy site here and leave a comment at the bottom of this post stating which item is your favorite. 
  • Visit CreativeSeam's Facebook page here and "like" them - then leave another comment on this post stating that you did so. (If you've already liked this page, simply post a comment stating that you already did.)
  • Share Jill's Etsy shop link (http://www.etsy.com/shop/CreativeSeams) on your Facebook page or blog, and leave another comment on this post stating that you did so. 
Remember, each comment left on this post only counts as one entry, so if you do more than one of these, be sure to maximize your entries. The giveaway will end on Monday, February 4th at 11pm EST. So get the word out, get your entries in, and enjoy all that CreativeSeams has to offer! 
Panda Quilt ~ by Jill Dow, CreativeSeams